Showing posts with label Home. Show all posts

Tuesday, 2 July 2013

Steps to format a computer


Windows

  1. 1
    Backup your data. When you format a computer, you will lose all of your files and data. The programs can’t be backed up; they will need to be reinstalled. Any files—including documents, music, pictures, and videos—that you want to save need to be copied to a backup location.
    • You can use DVDs, CDs, external hard drives, flash drives, or the cloud, depending on how much data you have to backup.
  2. 2
    Set your BIOS to boot from CD. To do this, restart the computer and enter the setup screen when the manufacturer logo appears. The key to do this will be displayed, and varies by manufacturer. The most common keys are F2, F10, F12, and Del.
    • Once in the BIOS menu, select the Boot menu. Change the order of devices so that your computer boots from CD before booting from the hard drive. Save your changes and exit. Your computer will restart.
    • If you are installing from a flash drive, then you will need to set the BIOS to boot from removable storage
  3. 3
    Begin Setup. If the CD has been inserted and the BIOS is set correctly, you will see a message telling you to “Press any key to boot from CD…” Press a key on the keyboard and the setup process for Windows 7 will launch.
    • Your system may automatically launch the setup program without asking you to press any key.
  4. 4
    Watch the Windows files load. After completion, the Windows 7 logo will appear. No files have been altered on your computer yet. Your data will be deleted in later steps.
  5. 5
    Choose your preferences. You will be prompted to confirm your Language, Time & Currency format, and Keyboard or input method. Select the appropriate options for you and click Next.
  6. 6
    Click Install Now. Do not click Repair Computer, even if you are repairing a computer by reinstalling Windows. Once clicked, Setup will begin loading the files it needs to continue.
  7. 7
    Read and accept the terms. In order to advance, you must indicate that you have read and agree to Microsoft’s terms of use. Be sure to read through it so that you know your rights and limitations as a user.
  8. 8
    Choose Custom install. This will allow you to perform a clean installation. Formatting the computer means wiping it of all the data that is on it, so you will be performing a clean installation nso that you will be given the option to erase the disk.
  9. 9
    Delete the partition. A window will open asking where you would like to install Windows. In order to perform a clean install, you need to delete the old partition and start with a clean slate. Click “Drive options (advanced).” This will give you the ability to delete and create partitions.
    • Select the partition of your existing operating system and click the Delete button.
    • If your hard drive has multiple partitions, be sure to delete the correct one. Any data on a deleted partition is lost for good.
    • Confirm the deletion process.
  10. 10
    Select the Unallocated Space and click Next. There is no need to create a partition before you install Windows 7, this is done automatically.
  11. 11
    Wait while Windows installs files. The percentage next to Expanding Windows files will steadily increase. This part of the process can take up to 30 minutes.
    • Windows will automatically restart your computer when finished.
    • Setup will launch again, and a message will tell you that Setup is updating registry settings.
    • Setup will then configure your computer’s services. This happens every time you start Windows, but will happen in the background next time.
    • A window will open letting you know that Windows is completing the installation. Your computer will restart again when this is complete.
    • Setup will now load drivers and check video settings. This part does not require any input from you.
  12. 12
    Enter your user name and computer name. Your username will be used to log in to the computer and personalize your account. Your computer name is the name that your computer will display on the network.
    • You can add more users later through the Windows 7 control panel.
    • Windows will ask you for a password. This is optional but highly recommended, especially if the computer will be accessible by users other than yourself. If you’d rather not have a password, leave the fields blank and click Next.
  13. 13
    Enter your product key. This is the 25-character key that came with your copy of Windows. Check the “Automatically activate Windows when I’m online” to have Windows automatically verify your key the next time it is connected to the internet.
  14. 14
    Select your Windows Update option. To make sure that your copy of Windows runs securely and stably, it is highly recommended that you choose one of the first two options. The first option will install all updates automatically, the second option will prompt you when important updates are available.
  15. 15
    Select your date and time. These should be correct already as they are linked to your BIOS, but you can change them now if they are not. Check the box if your area observes Daylight Savings.
  16. 16
    Select network preferences. If your computer is connected to a network, you will be given an option to identify that network. Most users will select Home or Work network. If your computer is being used in a public place, select Public network. Mobile broadband users should always select Public network.
    • Windows will now attempt to connect your computer to the network. This process is completely automated.
  17. 17
    Explore your desktop. After one final loading screen, your new Windows 7 desktop will appear. Installation is now complete.
  18.  CLICK HERE  IF U WANT TO SEE A VIDEO
                        HOW TO DO IT
                               
  19. COURTESY: WIKIHOW.COM


Tuesday, 5 March 2013

WordPress-delete all unused images

All those unwanted images from WordPress blogs can be removed by the use of a plugin named Delete Unused Images.While you use this plugin, it will scan your WordPress blog and finds the images that are not used with your blog posts or pages and lists.You can select the images in bulk or you can select one by one to remove it from your blog.
remove unused images from wordpress
Note : Before you use this plugin on your blog, I strongly recommend you to take back up of your blog.
I tried this plugin personally on my blogs and removed hundreds of images from it.Once you install the plugin on your blog(It can be done from WP dash board or through FTP), you can access it from Settings – DNUI. There you will get an option to scan your WordPress blog for Unused images.
delete unused images from blogs
Scanning the blog will list used and unused images from your blog.You will have the option to select unused images one by one or you can click the select all button to select all unused images from list and can press delete button to delete it.You can press the next button to get another query to find unused images in WordPress blog.

Remove Broken Links Automatically to Improve SEO

Hope this article helped you to save storage on your server by removing unused images from WordPress blogs.
--MORETRICKS.COM


Wednesday, 14 November 2012

INCREASE computer's speed


Increase your Computer Speed
This trick will help your computer work faster than ever before. To increase the speed of your computer, please follow the steps below:
·         Go to start, click run and then type “regedit”
·         Select "HKEY_CURRENT_USER”, then select control panel folder and after that select the desktop folder. Make sure you do it correctly.
·         You will see "registry setting" on your right hand side. After, select "menu show delay”, then right click on it and select "modify".
·         You will find "edit string option" where the "default value data is 400". Change the Value Data to 000.
·         Restart you computer after completing the above process. You will notice a significant change in your computers’ speed!


Source: www.pctrick.com


Saturday, 21 July 2012

Facebook Cover Photo Dimensions

  In order to make your Facebook Fan Page look  more attractive and to build more audience on this popular networking platform you need to know the dimensions of the Timeline cover photo and your Profile Photo as well which will make your audience recognize you in this tech savvy world which is connected by such networking sites.
  Cover photos are 851 pixels wide and 315 pixels tall. If you upload an image that's smaller than these dimensions, it will get stretched to this larger size. The image you upload must be at least 399 pixels wide. 
  To get the best quality image and fastest load times for your Page, upload an sRGB JPG file that's 851 pixels wide, 315 pixels tall and less than 100 kilobytes.

   So just look below image to know the dimensions
cover photo dimensions
Source: blog.firstgiving.com


Thursday, 19 July 2012

Best Facebook Cover Photos

Few months ago Facebook introduced a new change which gave the Facebook profile a complete new look known as the 'Timeline'. It is the massive image that appears at the top the profile which is specifically known as   Facebook Timeline Cover. Everyone wants such a Facebook Timeline Cover for their profile. So guys I have some of the best sites that will help you to choose your favorite Cover Photo that best suits your profile.

Best websites for Facebook Timeline cover pictures:

1. FBCoverPix.com
FB Cover pix  5 Best Sites to Find Attractive Facebook Timeline Cover Pictures
  • Clean website not loaded with too many ads as others.
  • Best collection of really cool Facebook Timeline cover pictures.
  • You can share these pics with other users.
  • You can download covers without watermark which makes this site stand out of the crowd.
2. MyProfileCover.com
myprofilecover.com Facebook Timeline Covers  5 Best Sites to Find Attractive Facebook Timeline Cover Pictures
  • High quality timeline cover photos.
  • You do not need to login into your Facebook account.
3. FreeFacebookCovers.org
Free Facebook covers  5 Best Sites to Find Attractive Facebook Timeline Cover Pictures
  • Very popular site which is already featured on websites like CNET, Yahoo etc.
  • No need to login into your Facebook Account. Just download the cover and use it.
4. CoverPhotoFinder.com
Cover photo finder  5 Best Sites to Find Attractive Facebook Timeline Cover Pictures
  • Highly recommended website if you’re looking for some lovely and colorful cover photos.
  • Just log in with your Facebook account, CoverPhotoFinder.com will set your favorite image as your profile cover.
5. FaceCoverz.com
Facecoverz  5 Best Sites to Find Attractive Facebook Timeline Cover Pictures
  • FaceCoverz.com has a large category of Facebook Timeline Cover Photos.
  •  Just go to the website, login into your Facebook account and set your desired cover image as your profile.
Source: webadvices.com


Friday, 13 July 2012

Apple iPhone 5 Pre-Orders Start In China


Although rumors and speculations surrounding Apple's sixth generation iPhone, presumably called "theiPhone 5," are at their peak, the highly anticipated smartphone is not likely to hit stores before the fall.
  • (Photo: Concept Phones)<br>Although rumors and speculations surrounding Apple's sixth generation iPhone, presumably called &quot;the iPhone 5,&quot; are at their peak, the highly anticipated smartphone is not likely to hit stores before the fall. But opportunistic traders on China's largest e-commerce platform, Taobao, seem to topple the Cupertino tech giant as they have started accepting iPhone 5 pre-orders, complete with fake pictures and purported technical specifications.
There has not been any official word from Apple as well regarding features and a release time frame of the device. But opportunistic traders on China's largest e-commerce platform, Taobao, surprisingly started accepting iPhone 5 pre-orders, complete with fake pictures and purported technical specifications, reported Reuters.
The report also said that sellers on Taobao, a unit of the Alibaba Group, were accepting orders for the next iPhone, for which they were asking for a deposit of 1,000 yuan ($160). One seller, named "Dahai99888," even asked for full payment upfront at 6,999 yuan ($1,100).


Thursday, 12 July 2012

Amazing Alex game by Angry Birds creator


Rovio the creators of 'Angry Birds' which made a huge success and now the firm is ready totry its hands on a new mobile game franchise. Amazing Alex is released today(12 July, 2012) for the iOS platform and also for android. It is a new physics based puzzle game with 100 levels to complete.
   Amazing Alex requires players to set up Rube Goldberg-like machines to complete various tasks in each level. In addition to the levels included with the game, Amazing Alex also features a level creator that allows players to design their own puzzles using 35 different objects
  The new game is available for the iPhone, iPad, and Android devices today, and Rovio says that it plans to bring the game to Windows Phone in the near future. The iPhone version costs $0.99, while the iPad one is $2.99. Android users can choose between a free version, a premium version, or an HD version of the game.


Wednesday, 11 July 2012

Lock your PC/ LAPTOP using pendrive


Hi Friends,

     Are you irritated by your friends or neighbor asking again and again for your PC/ LAPTOP, then this post is for you guys. Now you can lock your PC/ LAPTOP using your pen drive which will act as the key for the PC/ LAPTOP. No one else can access it without the pen drive. 

     Windows store its password in a file which is used during the startup. We’re gonna play with this file and lock the laptop with a pen drive.

Steps to Lock PC/Laptop with Pen Drive

  • Please make sure your pen drive is already connected to the computer before following the below steps.
  • Go to Run.
  • Type “Syskey” in the run and press enter.
  • Check the ‘Encryption Enabled’ option and click on Update.
  • The pop up box gives two options :
Windows Account Database How to Lock Your Laptop or PC Using Pen Drive?
Password Startup: This is if you require to setup a password to access computer during the system startup.
System Generated Password: It is the option which would help us lock the computer using a pen drive.
  • Check “Store Startup Key on Floppy Disk” .
  • Now, enter the password you wish to.
  • Click on OK.
  • Save the startup file in the pen drive ie. choose the location of pen drive.
lock computer using usb drive How to Lock Your Laptop or PC Using Pen Drive?
Next time, you would need this pen drive to login to your laptop/PC.
So now you can keep your data safe and confidential so enjoy it.


Monday, 9 July 2012

Currency Converter-Universal

Here is the Full Universal Currency converter for you


Kaspersky Anti-Virus 2013 13.0 free download with key

Features of Kaspersky Antivirus 2013:


  • Compatible with Windows 8.
  • Improved performance and speeds up your system.
  • Blocks Spyware and adware.
  • Scans mails for viruses.
  • Detects phishing sites.
  • Protects from keyloggers.
  • Real time protection against all types of malwares and viruses.
  • Scans websites for malicious activities.
The following Beta version has built in key and will give you 3 months of free license
  • Download through the following link
  • After the download is complete double click on the set up file for installation, after the installation is over you'll be asked to enter the activation code, since it is the beta version don't enter any code, so click on Activate Trial Version and you'll get 90 days of Kaspersky Antivirus license for FREE


Thursday, 28 June 2012

CorelDRAW Graphics Suite - CNET Download.com

CorelDRAW Graphics Suite X6 is a versatile graphic design software suite that helps you creatively and professionally express ideas for any media. Illustrate, lay out, trace, design Web graphics and photo-edit with this complete solution for visual communication. Easily import and export content with leading file compatibility. Get going faster than ever with new, professionally designed templates and compelling learning materials. Create with confidence, everything from distinctive logos and signs, to striking marketing materials, Web graphics and animations, billboards, car wraps and more. Offering increased speed, more accurate color control, and new and enhanced design tools, this must-have version helps you create extraordinary designs faster.
     So friends I have found out a site where you can download this latest software just click the following link and then carefully read the instructions and then install the software and you are ready.


Read more: CorelDRAW Graphics Suite - CNET Download.com http://download.cnet.com/CorelDRAW-Graphics-Suite/3000-2191_4-10265849.html#ixzz1z6w4zh44


Saturday, 23 June 2012

RIM launches BlackBerry Porsche P'9981 at Rs 1.4 lakhh


Porsche Design and Research In Motion launched a new BlackBerry Porsche Design P'9981 smartphone in India. The BlackBerry Porsche P'9981 is priced at Rs 1.39 lakh.

  • The Porsche P' 9981 8GB of internal memory.
  • Expandable upto 40GB with microSD card.
  • HD video recording. 
  • 24-bit high resolution graphics.
  • 1.2 Ghz processor. Liquid Graphics technology.

blackberry porsche


Thursday, 21 June 2012

Send SMS - Text Messaging

Hi friends,
     Their are many websites which give you service to send free SMS across any region. But they display a lot of advertisements, which takes a lot of time to load, and if your internet speed is slow then it is of no use 'coz it takes a lot of time.
     So their is a popular android app called "Free SMS Sender" to send free sms across Czech Republic, Slovakia, India, and Russia, this app supports 25 websites of these 4 countries to send free sms. We can send unlimited SMS using this app. To install this app go to android market and search for "Free SMS Sender"          TO DOWNLOAD CLICK HERE


Sunday, 17 June 2012

Who invented Internet?

As we all know nowadays internet has become the necessity in everyday life. Not only in office but home, universities, colleges etc. Even social media is familiar to all of us, it keeps us connected all the time whenever wherever we might be. But from where it all started from? Who invented Internet? 
                                         Click here to know more


Saturday, 16 June 2012

What are Transistors

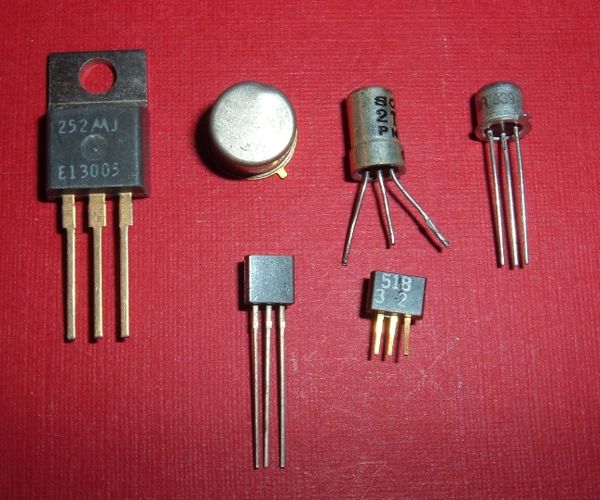
Trasistor was developed by John Bardeen, Walter Bratain and William Shockley at the Bell Laboratories on December 23, 1947. The Word "Transistor" is short form of tranfer resistance. It is made up of semi conductors, it is used to control the amount of current or voltage used for modulation or switching of an electrical signal. The transistor is the primary building block of the microchips, including your CPU, and it is that component that creates binary 0's and 1's your computer uses to communicate.
transistor


History of Computer's processor

computer processor


YearEvent
1823Baron Jons Jackob Berzelius silicon (Si), which today is the basic component of processors.
1903Nikola Tesla patents electrical logic circuits called "gates" or "switches".
1947John Bardeen, Walter Brattain, and William Shockley invent the first transistor at the Bell Laboratories on December 23, 1947.
1948John Bardeen, Walter Brattain, and William Shockley patent the first transistor.
1956John Bardeen, Walter Brattain, and William Shockley are awarded the Nobel Prize in physics for their work on the transistor.
1958The first integrated circuit is first developed by Robert Noyceof Fairchild Semiconductor and Jack Kilby of Texas Instruments. The first IC was demonstrated on September 12, 1958.


Thursday, 14 June 2012

Free Cloud storage service

What is Cloud Computing?
 Cloud computing is the delivery of computing as a service rather than a product, whereby shared resources, software, and information are provided to computers and other devices as a utility(like the electricity grid) over a network (typically the Internet).-> Know more on cloud computing
cloud storage


  Today I am going to tell you top 5 FREE cloud storing services, Here are URL  of  the sites that provide it: 


Wednesday, 13 June 2012

How To Easily Create Automatic Updated Sitemap For Blogger ...

Hi Friends,
     Today I am going to show you how to create sitemap of blogger blog, so that your site gets noticed by search engines. I also had a similar question in my mind when I wanted to submit it to google. Don't get confused just watch the following video.


Wednesday, 6 June 2012

Delete wall posts


Maybe you woke up from a long night and realize you've made a horrible mistake, posting dozens of embarrassing pictures (or worse) to Facebook. Maybe you've just decided that your five years on Facebook were experimental and you'd rather move on.
In either case, deleting more than a couple of posts or pictures can be a major pain. CNET's Elinor Mills recently wrote up a neat Android tool called Exfoliate that can scour your Facebook history and permanently delete some or all content. (iPhone users should see it come to the App Store soon.) Here's how to use it: 
Facebook
Add caption

Facebook Wall before Exfoliate.
  1. Install Exfoliate from the Android Market.
  2. Tell Exfoliate which data to delete. This is mostly straightforward, organized into time and content type. If things don't seem to work out the first time, try again with Background Override checked. If you're on a network you trust, you can uncheck Use Https Only to speed up the operation considerably. 
    Step 2: Choose data to delete.
    Step 2: Choose data to delete.
  3. Sign in to Facebook. Exfoliate doesn't retain your log-in information. 
  4. Authorize Exfoliate as a Facebook app. It needs a lot of permissions, as it has a lot of work to do. 
  5. Now is your last chance to reconsider. Start Exfoliate by tapping the big button on the bottom of the screen. 
    Step 5: Begin processing.
    Step 5: Begin processing.
  6. If you get cold feet or suddenly remember you need to save a pic or two, you may have a chance to stop some deletions. Exfoliate starts with the oldest data, so you can tap the cancel button and hope you caught it in time. If not, it's gone forever, so think carefully. 
  7. This is a slow process. If you're deleting more than a few posts, you should probably leave it running and plugged in overnight. 
    Facebook Wall after Exfoliate.
    Facebook Wall after Exfoliate.
That's it. As with any other app or service that makes irrevocable changes, you should think carefully before using it. For some users, though, Exfoliate could be a life-saver.